
Greenleaf Annabelle Dollhouse Project
Opening the box reveals no less than 17 sheets of plywood, each one intricately stamped with a different pattern. Many of the boards are numbered, but some of them aren't, so you have to look at the pattern and compare it to the instructions in order to figure out which board it is.
Let's Get Started
We'll start by following the instructions, we're going to assemble the base/foundation first. Most books and the instructions say to
prep the pieces before working on them. Prepping involves sanding the edges smooth and then applying a sealer to the bare wood.
We sanded all the foundation pieces and then applied a coat of Gesso to everything and let it dry. Unfortunately, little beads of extra sealer formed at the edges of the wood making putting the pieces together difficult, so from this point forward we'll seal most of the sections AFTER we glue them together.
There are 2 large pieces which when put together form the outline of the base. These 2 pieces must be glued and set aside to dry overnight. After letting the glue dry on the 2 base pieces, we started adding the foundation side walls:
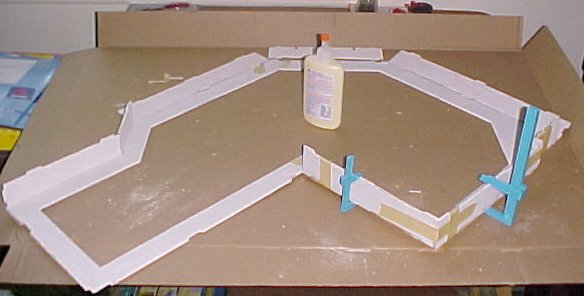
Notice the clamps holding a couple of pieces in place to make a strong joint. At this point we started encountering some difficulty with the pieces not fitting together perfectly because of the coat of Gesso. In addition, I realized that if the entire base wasn't assembled exactly right, the tabs for the first floor might not line up perfectly.
Checking the instructions, it specifies that the entire base should be assembled first with tape, and then "glued in place". We decided to assemble the rest of the base using that method, and then glued it.
To make sure that everything would line up, we then placed the first floor onto the assembled and still wet base. Indeed some of the tabs weren't lining up correctly, but since the glue was still wet, it was easy enough to make some minor adjustments. Once we did that, we taped the first floor onto the base and put it aside to dry. After drying, remove the main floor section from the base.
Dry Run
The instructions for the house don't talk about this, but it's a good idea to do a test run by putting the major house sections together using tape, just to see if everything fits.
Here are a couple of views of the taped main sections:
Now take it apart
Once you're satisfied that all the major pieces fit together, take them apart again! This sounds like a wasted effort, but you'll appreciate it later.
Start Building!
Reattach the first floor to the foundation, tape it securely, glue it together, and set it aside to dry.
Within a few hours, you should be able to start gluing the
main pieces to the first floor. Reassemble the kitchen/dining room wall, the front walls, and the entryway. Line them all up carefully, apply a bead of glue at each joint,
and tape each piece to the adjoining piece tightly. Leave the whole thing to dry overnight, the glue needs time to set before you continue.
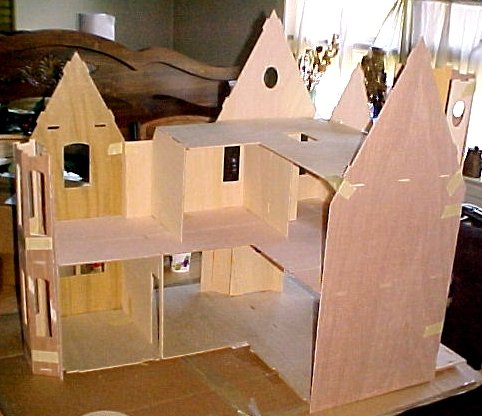
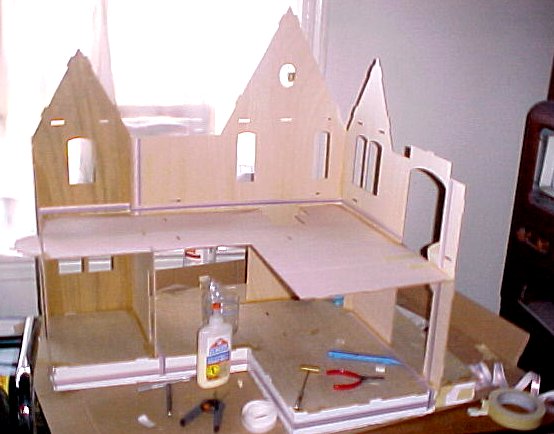
Your
house should look a lot like this now:

Wiring
This would be a good time to start the electrical layout. You're supposed to first design your electric layout on paper and make a note of where every light will be
in the finished house. Well, we don't know exactly what we're going to do yet, so we're going to overdo the wiring a bit. Plus, we'll make some redundant
connections so that we don't end up with any problems later on.
We figure that we're going to have a lot of lighting in this house, so we bought the deluxe Cir-Kit wiring kit. It has everything we need to get started and will light up to 66 bulbs!
We decided to make our attachment point near the kitchen, behind the bay window near the back corner. We ran our first wiring strip all the way across the back foundation, starting at the bay window and going all the way over to the edge of the living room. It might have been a good idea to continue this "distribution" strip around to the front of the house too, since we're going to illuminate the porch, but we cut the strip before thinking of it.
After attaching the strip to the base, we tap the main power connector into the strip, connect the main power, and then test that the strip is getting power.
Our next strip will run from the distribution tape, through the dining room, and up the front wall as far as possible. A third strip is run along the front living room wall to the entryway, and another strip crosses that one at the edge of the living room, traveling vertically up towards where the tower will be located.
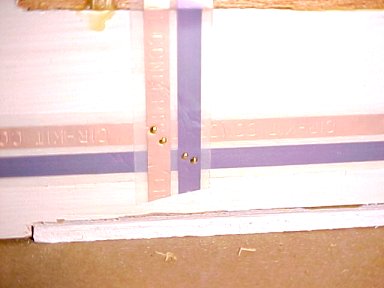
When you run additional strips, you have to make an electrical connection to original strip, and that's done with tiny brass nails called brads. Using a
small brass hammer, 4 brads are nailed into each crossover in order to make a secure power connection. Here's a detail of a finished connection:
Add the second floor
At this point, we had a couple of basic wire runs, so we decided to add the second floor and glue it in place. There's still some electric wiring that needs to be done
on the first floor, but we also need to wire for ceiling fixtures, so the second floor needs to be added. Place the second floor into position, make sure it's lined up properly, and glue it in place.
After gluing, tape it tightly and leave it to dry.
Second Floor Wiring
Next, we ran a strip all the way across the second floor at socket level so that we'll be able to add outlets later. At each point where this strip crosses
the vertical strips, connect them with brads, being careful to make sure you only nail where the colors match.
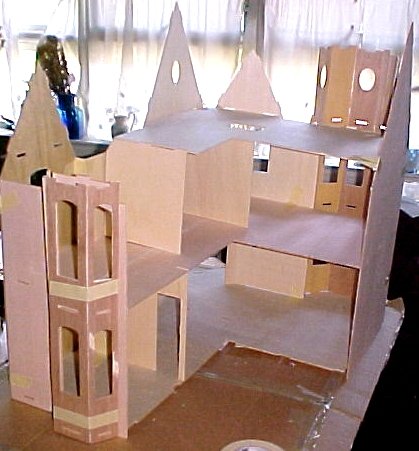
Your house should look a lot like this now:
What's Next
We've now completed our first weekend of work on the house. This represents several hours of work spaced over several short sessions during the weekend.
We're kind of stuck for the moment trying to decide if we should wire in wall switches in order to turn some of the lights on and off individually. You can find out in the next installment
Greenleaf Annabelle Dollhouse Kit $179.95
Cir-Kit Deluxe Wiring Kit $109.95
Hobbyist Tool Kit $49.95
Brass Hammer $11.95
Gesso, 32oz bottle $11.95
metal file set $12.95
You can get these supplies listed below in any hardware store:
2" width paint brush
sandpaper
masking tape
Carpenter's Wood Glue